Changing the Data Type of Our Columns in SQL
In our last post, we created a SQL Server database for our project and successfully imported Version 2 of our dataset into it. We did this using the Data Import Wizard that comes with SQL Server Management Studio. While the Import Wizard is convenient, it often has trouble importing the data exactly as we want it. This can become an issue during our analysis, because it might prevent us from using certain functions in SQL the way that we would like.
We are going to use a SQL query to change the data types of certain columns in our new table. This will be done by using two basic, yet powerful statements in SQL: ALTER TABLE and ALTER COLUMN. These two statements are used to make alterations on a given table and work in conjunction with each other.
ALTER TABLE is used to select the table that we are going to make alterations on. By itself, this statement does nothing. It needs another statement to specify what changes will be made to the table.
ALTER COLUMN is used right after ALTER TABLE, and is the statement that specifies which column will be changed and what kind of changes will be made.
We will begin our alterations to our new table by first making a new SQL query. Clicking the New Query button in the Management Studio menu will bring up a fresh window for us to work in.
Before we begin writing our query, let’s save the file that we will be working in first. Click “File” on the top left of the menu and then select the “Save” option. It will have the auto-generated name of the blank window next to the word “Save”, but this name is just a place holder and will not be permanent unless you save it as such. Clicking the Save button will bring up the save window, where you can type in the desired name of your current file. Name the file “ALL-YEAR-2021-table-alterations”, in order to specify which table you are working on and what the query will be doing.
Now is a good time to quickly go over the different types of data that we will be working with in our table. Certain columns, like day_of_week and ride_id, have data that are made up of simple words or number-letter combinations. These are considered strings, can can basically be thought of as words that one might want to look up. The Import Wizard lists every column as a string by default. The columns that we did not change in the Wizard are still listed as strings, and some of them can stay that way.
There are some columns that have data relating to specific dates and times. This kind of data is considered datetime in SQL, and can be used to accurately query data based on what time range in falls within or outside of. We will want to change the datatype of time related columns from string to datetime because leaving it as a string can cause errors in the way SQL sorts out our data during a query.
Data that consists purely of numbers can fall under several different datatypes in SQL, just depending on the kind of numbers that they are. For instance, all of our columns that deal purely in numbers have a decimal point in them. While we were using the Import Wizard we changed all of these rows to the float datatype. Float can be used with any numbers that have a decimal point within them, and did not require any specific details on the decimal points’ location while we were using the Wizard. We could probably use these columns as they are, but to ensure precision we will change these columns into the decimal datatype. Decimal is just like float, except that it requires us to specify where the decimal point will be and how many spaces can follow behind it.
With the basic knowledge of datetime and decimal datatypes, we can begin the bulk of the alterations that we will be making to the table.
We’ll start by typing a USE statement in order to make sure that we are working within the correct database. On the top line of the file, type in:
USE CyclisticTripData2021 ;
Note that the semicolon ( ; ) at the end of the line indicates that this is where the statement ends. You can save the query as is and then click the Execute button to run this line of code. Our Cyclistic database is now selected and we are ready to make our first alteration.
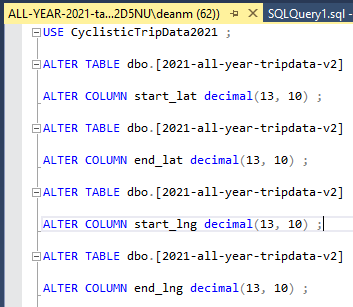
The first set of columns that we will change will be our coordinates (start_lat, start_lng, end_lat, end_lng). Starting with our start_lat column, we will first want to write and ALTER TABLE statement that calls up our table for Version 2. After ALTER TABLE type in “dbo.” in order to let SQL know that you are pulling up a Database Object. Once you do this, a dropdown menu will reveal the names of all the tables that we have in our database. Since this is the only table that we have so far, it should be the only option. Click on your table name and then press Enter on your keyboard twice to leave some space for the next line of code. Your ALTER TABLE statement should look like this:
ALTER TABLE dbo.[2021-all-year-tripdata-v2]
The next step is to specify the change we would like to make by using an ALTER COLUMN statement. Type in ALTER COLUMN and follow that by the name of the column that we want to change, which is “start_lat”. We follow this with the name of the datatype that we wish to change the column to, which is decimal. The decimal datatype requires us to specify how many digits will be allowed in a cell, and how many spaces will there be behind the decimal points. Our coordinates all consist of up to 13 digits, with up to 10 digits being behind the decimal. We would write this in our line of code as: (13, 10). Here is what the entire line of code should look like:
ALTER COLUMN start_lat decimal (13, 10) ;
We have written the statement for our first altered column. Our file should look something like this:

When we run this line of code, the console at the bottom of the Management Studio window will have a message stating that we were successful. If it doesn’t, you will want to double check that everything was typed correctly.
Once we are sure that the first statement ran correctly, we can repeat this process for the other 3 columns that have coordinate data (start_lng, end_lat, end_lng). Our file should look like this now:

There is one more column that we will want to use the decimal datatype with. Our column which measures the approximate Trip Distance (trip_dist_miles) uses three spaces behind it’s decimal point. We should allow for 3 spaces ahead of the decimal point in our ALTER COLUMN statement. Therefore, we will have 6 total spaces in our column with 3 spaces behind the decimal. Our alteration statement for the Trip Distance column should look like this:

We can now run every line of code here and complete the alterations that we wish to make on our table using the decimal datatype.
The two columns that have data containing dates and times (started_at and ended_at) are still in need of alteration. At this point, they are still registered as string in our dataset. We are going to change these two columns into datetime.
We will be using a version of datetime that fits our data the best. Specifically, smalldatetime is used to format datetime data into a numbered date followed by time in hours, minutes, and seconds. The format for smalldatetime reads YYYY-MM-DD HH:MM:SS.
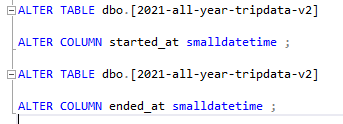
When writing our smalldatetime query, the same rules apply for the ALTER TABLE part of the query, and ALTER COLUMN is nearly the same. For ALTER COLUMN, we will list the column name and then type smalldatetime before closing off the query with a semicolon. Once we have done this for both started_at and ended_at, our code should look like this:

All we need to do now is run those last two queries and make sure that they are completed successfully in the console.
We now have all of the major alterations completed. In the next post, we will go over the basic SQL statements that will help us to check our data. We will be using those statements to run our first queries which will actually explore the data.